Use Case: Automation of Intercom Fi
| Metric | Intercom Fin | Latenode AI Agent | Change |
|---|---|---|---|
| 💰 Monthly Cost | $609 | $140 | –77% |
| 👥 Resolution Cost | $1 | $0.03–0.04 | >20x cheaper |
| 🧹 Spam Filtering | Manual | Automated | Improved |
| 🏷️ Vendor Lock-In | Yes | No | Full Control over logic |
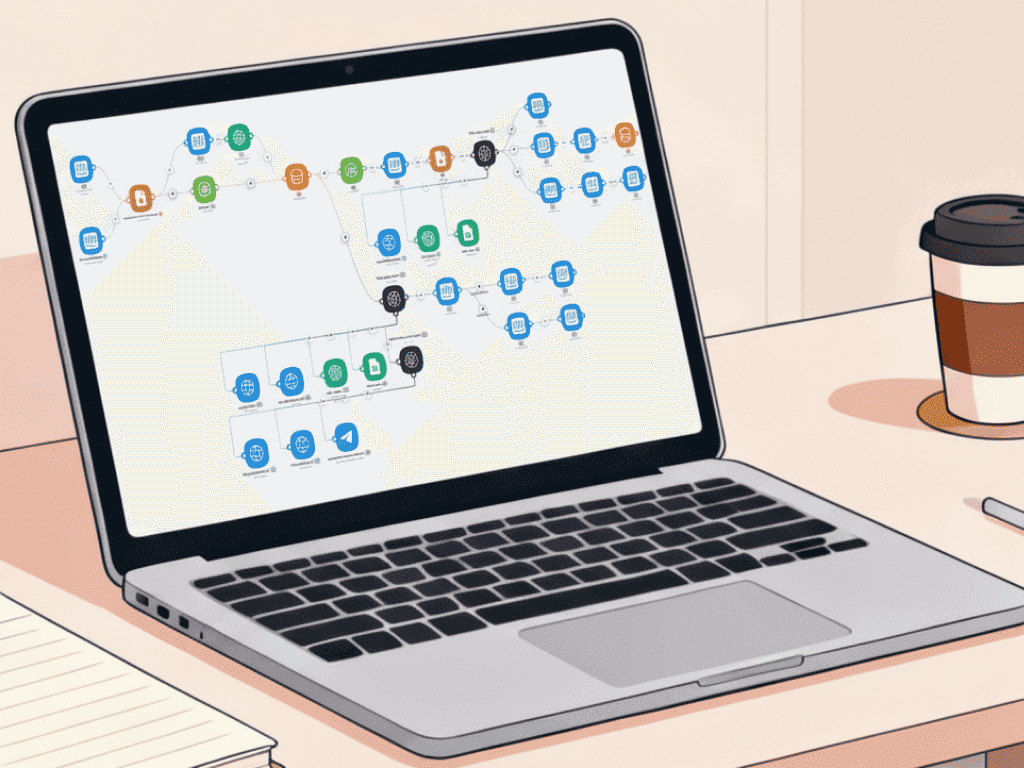
→ Follow this free Setup Guide to set up an AI Support manager for Intercom
Support Shouldn’t Be a Bottleneck
Most AI tools promise to help, but end up adding more layers, more friction, and more customer frustration.
AI Support Manager is built differently:
- It’s fast and really works
- It understands business and user behavior context
- It’s 100% customizable
- It has a powerful Latenode no-code automation platform on the backend, so it will never get broken
- It takes decisions like your tech support team lead, costing you like a junior intern
Cut off your support costs by 70–80%, while improving response times and freeing up your team.
How the AI Support Manager Works
- When a new message arrives, it instantly checks:
Who is this? What do they want? What’s the fastest, smartest way to respond?
- Then it acts in two ways:
First-Time User
- Greets the user and detects if it’s spam
- Responds instantly to simple questions
- Searches your vector database for complex queries
- Pulls in relevant links from Google Sheets
- Tags spam and reports it internally (if needed)
Outcome: Most first-time questions are resolved on the spot – no human needed.
Way 2: Returning User
- The agent remembers the last 5 messages
- Picks up the thread naturally
- Skips spam checks (user already verified)
- Knows when to escalate to a human or close the case cleanly
Outcome: The conversation feels smooth, human-like, with zero manual work.
With Latenode’s visual canvas, you can edit all parts of this AI agent’s configuration, which means no black box or hidden handoffs. Just a clear workflow, every time.
What Makes It Smart
- Classifies users and intents automatically
- Routes and answers in seconds
- Knows when to stop or pass to a human
- Keeps the system clean by tagging spam and tracking every message
What’s Under the Hood
- Internal Database: All responses are grounded in your docs.
- 5-message memory per user: real conversation context.
- Google Sheets integration to store all Help Page links.
- Spam detection & tagging.
- Human handoff logic when the user needs it.
- It knows working hours: warns users about delayed replies from a human.
- CRM-compatible (any system – not locked to Intercom or Zendesk).
It understands user intent, searches your knowledge base, filters spam, knows the context, remembers past chats, and reassigns the ticket to a human on request or when it’s stuck.
It’s Not a Black Box! You Fully Manage the Agent
- Full Control: Edit all prompts, tune the agent, and adapt it to new integrations.
- Transparent Cost: Pay only for what you use - no hidden fees.
- OpenStack: Integrate with any CRM, database, or internal system.
- True Ownership: You see and manage every logic step, tag, and conversation.
- Better ROI: Most clients see savings of 70–80% with faster, more reliable support.
CapabilityMost Support AI Agents Latenode AI AgentMemory0–1 turns5-message memory per userCustomizationGated, black boxFull access, editableIntegrationLimited, vendor-ledAny tool, your stackCost ControlFixed/variable feesPay for what you run
Getting Started
- Create a Latenode account
- Import the ready-to-go blueprint
- Follow the setup guide and connect your docs and knowledge bases to the agent
- Start providing world-class support services
