PRICING
PRODUCT
SOLUTIONS
by use case
learn more
BlogTemplatesVideosYoutubeRESOURCES
COMMUNITIES AND SOCIAL MEDIA
PARTNERS
%20(1).png)
%20(1).png)
Note: After adding new nodes in the Latenode chain of a project, to access the data from the previous nodes, you need to run the project and call the chain with all the necessary data. Data substituted from "JavaScript" node into "HTTP request" node often needs to be escaped with double quotes. Complex objects or arrays received in response to request from remote servers and coming as string must be processed by JSON.parse in order to work with them in "JavaScript" nodes as with corresponding data type.
First, be sure to get the token according to the instructions in our article, only in the list of servers select "Google Calendar Api v..." and in the scope "www.googleapis.com/auth/calendar ";
Next, create a new calendar in Calendar, we can call it for example "LatenodeTest";
Let's prepare a request for our rest client;
Let's substitute our token obtained from the step at the beginning;

Change the start date "startDate" and end date "endDate" to the nearest, you can also change the time zone if it does not fit is startTZ and endTZ;

Create a "Webhook" node: "+ Add node" => "Http" => "Webhook";
Copy the Webhook address and paste it into the rest client address bar;


Next, let's add another node "JavaScrtipt": "+ Add Node" => "Code" => "JavaScrtipt";
Save the changes;
Tie the node together;
Let's start and call the chain to transfer data between the nodes;
Let's copy the contents into it:
Let's check in all constructions like "data["{{1.body.name}}"]" that the number of Webhook corresponds to the one we are getting data from, if not replace it with the necessary one (let me remind you that 1 is the node number written just below the node name above the node type, then if it is a query then the object field responsible for the type of sent/received data is selected - body for forms or query for query parameters);

Save;
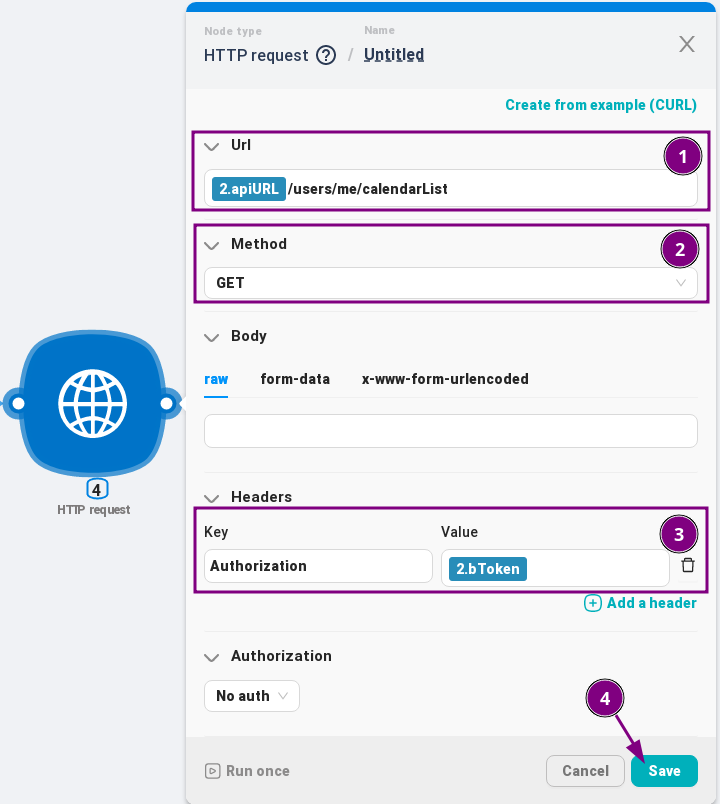
Let's create the "HTTP request" node: "+ Add node" => "Http" => "HTTP request";
Save the changes;
Tie the nodes together;
Let's start and call the chain to transfer data between the nodes;
In the "Url" field at the beginning let's substitute the variable "apiURL" from "JavaScrtipt" and after it we specify: /users/me/calendarList ;
Make sure that the default method is "Get";
Let's add the title "Autorization" and in its value the variable "bToken" from "JavaScrtipt";
Click "Save";

Let's create another node "JavaScrtipt": "+ Add Node" => "Code" => "JavaScrtipt";
Save the changes;
Tie the nodes together;
Let's start and call the chain to transfer data between the nodes;
Let's copy the content into it, to find the desired calendar from the list obtained from the previous query:
Check the data that are specified in the comments to the code;
Save
Let's create the "HTTP request" node: "+ Add node" => "Http" => "HTTP request";
Save the changes;
Tie the nodes together;
Let's start and call the chain to transfer data between the nodes;
In the "Url" field at the beginning we substitute the variable "apiURL" from the first "JavaScrtipt" node, after it we add: /calendars/, then we substitute the variable "targetCalendar.id" from "JavaScrtipt" with the calendar list processing, and at the end: /events;
Change the method to the "Post" method;
In the body of "raw": let's substitute the variable containing the object with the new event from the first of the first "JavaScrtipt" node;
Let's add the "Autorization" header and in its value the variable "bToken" from the first "JavaScrtipt" node;
Click "Save";

Tie the nodes together;
Let's start and call the chain to transfer data between the nodes;
After that, a new event should appear in the calendar;

At the end of the whole chain in Latenode will look like this:

See you in future articles;
Latenode
Google OAuth 2.0 Playground
Google Calendar API
Google Calendar API CalendarList: list
Google Calendar API Event: insert


