

How to build an app with AI: the short answer
Yes, you can build a working web app with AI without writing code. You describe the app in plain language and approve a plan. An AI app builder generates it, and you refine it in chat, check its data and test it. Then you publish it on your domain and connect it to your other tools.
- Describe the app in plain language.
- Ask for a plan before any code is written.
- Let the AI build it and check the live preview.
- Refine it with small, specific changes.
- Check the data your app stores.
- Test it like a user, on a phone too.
- Publish the app on your own domain.
- Connect the app to your other tools with a workflow.
The first clickable version comes quickly. Most of the time goes into rounds of changes and testing.
What you can build with an AI app builder
You can build web apps that run in any browser, phones included. Typical examples are internal tools, dashboards, client portals, booking and order forms, simple CRMs, landing pages and MVPs to put in front of users.
These tools handle screens, forms, lists, a database and simple rules, such as closing a class once it is full. They have a harder time with heavy custom logic and with large projects where each change touches many screens. Apps that must go through App Store review are harder too, and the FAQ covers them. A developer still makes sense for unusual logic, for systems without an API, or for a review before real customer data goes in.
Before you start: pick the kind of tool and get ready
Three kinds of AI tools build apps: AI app builders in the browser, no-code platforms that added AI, and AI code editors or coding agents. If you do not code, start with the first kind.
| Kind of tool | You start from | Who edits the code | Hosting | Good for |
|---|---|---|---|---|
| AI app builder in the browser | A chat prompt | The AI, on request | Usually built in | Non-coders |
| No-code platform with AI | Prompt or visual editor | You, with AI help | On the platform | Internal tools |
| AI code editor or agent | A code project | You and the agent | You set it up | Developers |
Base44, Figma Make, Google AI Studio and Replit are builders of the first kind. Bubble, Softr and Retool are no-code platforms with AI, and Cursor and Claude Code are coding agents. Get these ready before you begin:
- An account in the builder.
- The idea, written down.
- Sample data instead of real customer data.
- Your domain's DNS settings, for Step 7.
- Access to the workflow tool and CRM you want to connect in Step 8.
The steps below use a class-booking app as an example. Keep the sample bookings fictional until you have checked access permissions.
Step 1. Describe the app in plain language
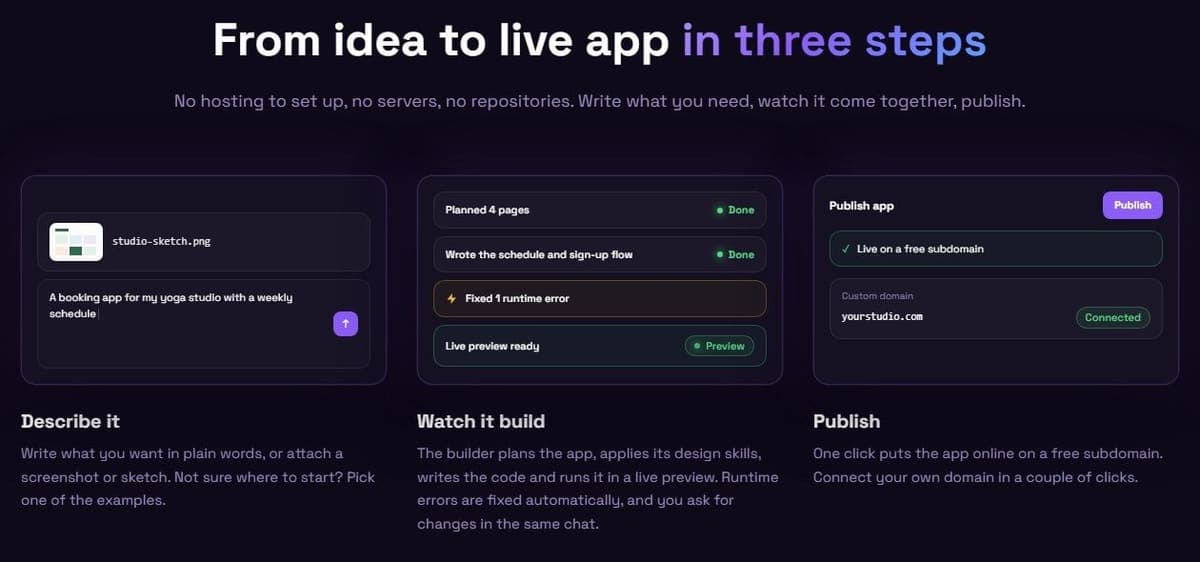
Write four to six sentences: who uses the app, what they do in it, what it stores, which pages it needs and how it should look. A screenshot or sketch helps.
- Users: clients, staff or both.
- Actions: three to five things they do.
- Data: what gets saved.
- Pages: one line each.
- Look: colors, mood, a reference layout.
Take a small yoga studio's class booking app. Its description could list a weekly schedule, a booking form with name and email, a list of bookings for the owner and a calm look in the studio's colors. Keep passwords, API keys and real customer data out of any prompt.
If the builder accepts images, attach a sketch of the weekly schedule. Also describe in words what should happen when a visitor picks a class.
Result: a short description naming the users, their actions, the data and the pages.
Step 2. Ask for a plan before any code is written
Ask the AI to plan first. The plan should cover pages, data and features, and the AI should ask about anything it does not know. Answer its questions and fix the plan now, because changing a plan is easier than rebuilding screens.
If your builder has no plan mode, ask for the pages and data in your first message and approve them before the build. For the booking app, check the fields, who sees the bookings and what happens when a class is full.
Put the class capacity in the plan, and say who may read the guest list. Ask the builder to show the plan before it changes any files.
Result: an approved plan with pages, data and features.
Step 3. Let the AI build it and check the live preview
The builder writes the code and runs the app in a live preview. Before you ask for changes, try each core action once, such as booking a class and finding it in the owner's list.
"Building an app with AI operates through a conversational and iterative cycle that handles both the low-level logic and the high-level deployment."
Source: cloud.google.com
Write down each problem as you find it. You will work through that list in Step 4.
Start with one class and one sample booking. Check that the owner can see the new record and that the visitor gets a confirmation. Do this before you polish the design.
Result: a first working version you can click through, with sample data.
Step 4. Refine it with small, specific changes
Ask for one change per message and point at the exact element. Say what you want, then check the preview each time. If a change goes wrong, return to the last good version instead of stacking fixes on top of it.
Name the page and the element, such as the Book button on the schedule page. Describe the end state you want, not the steps to get there.
For example, you might ask for a clearer Book button on the weekly schedule. Save the earlier version first, and after the change check that the booking form still opens.
Result: the app matches the plan, and you know which version to return to.
Step 5. Check the data your app stores
Open the app's database and check that each form saves the fields you expect. Keep test data apart from real data. Before real users arrive, learn how to export data and undo a wrong edit.
Submit the booking form with sample details, then compare the saved record field by field. Collect only the personal data the app needs.
Try editing a sample record and exporting it. Find out what a restore covers before you need one for live bookings.
Result: tables with the right fields, sample records and a first CSV export.
Step 6. Test it like a user, on a phone too
Run every core action with test data, once in a desktop browser and once in a phone browser. Try wrong input, such as an empty form or a bad email address. Before you publish, ask two or three people to use the preview.
Watch without helping and note where people hesitate. On the phone, check that buttons are easy to tap and nothing runs off the screen.
Open the staff page while signed out. Then sign in as one test customer and check that another customer's booking details stay private.
Result: the core actions work on both screens, and the testers' fixes are done.
Step 7. Publish the app on your own domain
Publish to the builder's free address first and check the app there. Then connect your own domain with the DNS record the builder shows. A subdomain such as book.example.com keeps the app apart from a main site hosted elsewhere.
A CNAME record points an alias domain or subdomain to another, canonical domain. Cloudflare notes that it must point to a domain, never to an IP address.
At your DNS provider, enter the hostname and target exactly as your builder's domain settings show them. Then check that the booking page loads over HTTPS and that a test submission still reaches the database.
Result: the app is live on your domain over HTTPS.
Step 8. Connect the app to your other tools with a workflow
Have the app send each new record, such as a booking, to a workflow through a webhook or an API request. The workflow can add the person to your CRM, notify the team, run an AI agent and send the result back.
A webhook lets one system subscribe to events in another and automatically receive the data when they occur. For the booking app, the chain looks like this:
- A new booking is saved.
- The client goes into the CRM.
- The team chat gets a message.
- An AI agent writes the confirmation email.
Send one test booking through the workflow and check that the right CRM record and notification appear. Only then turn the workflow on for everyone.
Result: each new booking reaches your team's tools without copy and paste.
Can you build an app with AI for free? What it costs
Budget for edits, AI calls and hosting.
| Tool | Free start | Usage unit | Paid from | Hosting |
|---|---|---|---|---|
| Base44 | 25 message credits/mo, 5/day | Message, integration credits | Starter $16/mo billed annually | Own domain on Starter |
| Figma Make | 150 AI credits/day, 500/mo | AI credits, amount varies | Professional, $16/mo annually | Starter: via Figma Community |
| Google AI Studio | Free to build | Gemini API usage | Paid tier, $5 prepay | 2 apps free, eligible accounts |
| Latenode App Builder | First app free for new accounts | Pay per step | Next simple site from $0.50 | Free to 1,000 visits/month |
All prices are US prices. Figma charges per Full seat. In Google AI Studio, the API prepayment starts at $5 depending on region, and shared apps use your API quota. Cloud Run may charge beyond its free limits.
As of November 2026, the Latenode AI app builder shows the price of each later step in the chat. Hosting starts at $5/month for 30,000 visits. Its cake shop demo took five minutes and $0.57 to build and publish, and its calorie tracker demo cost $1.19. It does not build native App Store or Google Play apps.
Common problems and how to fix them
Most problems come from asking for too much at once, skipping the plan or testing only on a desktop. Smaller requests, a saved version to return to and a phone test fix them.
| Problem | Likely cause | Fix |
|---|---|---|
| AI changes parts not asked for | Request too broad | One change per message |
| Same error keeps coming back | A fix loop | Roll back, describe the error |
| Looks like every other AI app | No design direction | Add a reference screenshot |
| Layout breaks on a phone | Tested on desktop only | Test in a phone browser |
| Custom domain does not work | DNS record wrong or not live | Verify DNS target and HTTPS |
| Credits or budget run out fast | Many vague prompts | Plan first, group changes |
When an error survives a second fix, stop asking for more fixes. Roll back to the last version that worked and send one message: what you clicked, what you expected and what happened, plus a screenshot. Loops also cost money. In Figma Make, every prompt costs credits, including prompts sent to fix a previous result.